
Last Updated on April 29, 2024 by Jawad Ali
How to Draw a Throne A Step-by-Step Manual
There are some telltale signs that someone has royal status. Some classic examples would be an elegant crown or a luxurious robe, but one of the best ways to show that you are a complete monarch is to have an opulent throne. Many examples of these types of thrones have been featured over the years, and many different designs have been featured.
Learning to draw a throne is a great way to imagine what it would be like to be royalty. This tutorial will direct you on how to play a beautiful model of one of these royal thrones. So sit back on your comfortable throne (or chair) and enjoy our step-by-step guide on how to draw a throne in 6 easy steps.
Also read: house drawing
How to Draw a Throne – let’s Get Initiated!
Step 1
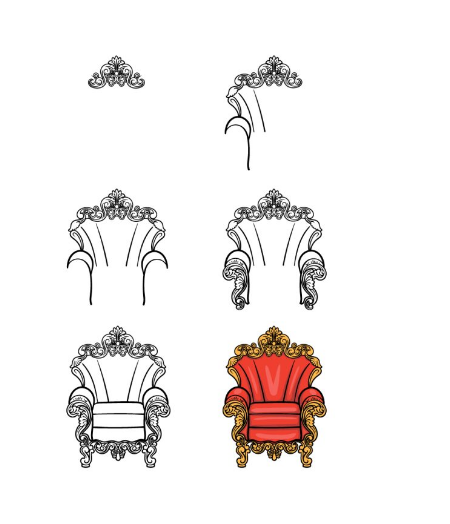
Every great throne will have some elegant and opulent details, and that’s what we’ll start with in this first step of our guide on how to draw a throne. This detail will go above the throne where your head would rest. The design has a classic feel, with many swirling shapes and a symmetrical design.
If you want this exact design for your drawing, carefully copy the lines as they appear in our example and try to make them look symmetrical. You can also add your decorative design if you wish! However you decide to do it, you’ll be ready for the second step of the guide.
Step 2
Now that you have completed the top decoration of your throne drawing, you can start drawing the sides of the throne now. First, add a few more swirl shapes to the left side of the decoration you started earlier.
Next, we’ll use some more curved lines for the sides of the chair and the top of the armrest on the left. We’ll be adding more to these articles very soon, so let’s jump to step 3 of the guide to continue!
Step 3
In this third step of our guide on drawing a throne, we will draw the right side of the throne. The good news is that you’ll be recreating what you did in the previous step, so you’ve already done it once!
This right side of the chair will be a mirror image of the other side, so do your best to make it look as similar as possible to what you just drew. Once this side of the throne is finished, we’ll add more in the fourth step of the guide.
Step 4
In the next part of your throne drawing, you will add more decoration to the front of the throne. These decorative pieces will be very similar in tone and structure to the ornament near the head of the chair.
These new units will go on the front. Of the armrests, and will have the same classic curly design that you drew earlier. Again, this is how we decorated our example, so you can choose the same design or add a new variant if you prefer. !When you’re done with these sections, we’ll finish the details and finishing touches in the next step of the guide.
Step 5
Now you’re ready to finish the design in this step of our guide on how to draw a throne! This step will have you ready to have fun coloring in the final step of the guide. First, let’s draw the center of the chair. This can be drawn as a square shape in the center, and then you can draw horizontal lines across it.
Once that’s done, we’ll add some prayer details below the throne seat. Finally, finish with the legs of the chair will also be in the same style as the rest of the details. Once you’re done, you can also add your ideas and additional details! Maybe he could draw a background or even add a member of the royal family at his side. What else can you feel of to finish it?
Step 6
You have reached the final step of this throne drawing, and now you can finish with some colors! In our reference image, we opted for a very realistic color scheme of deep reds with gold for many details. When you color your version of this image, you can opt for these same shades or use some of your own.
Purple is also associated with royalty, so perhaps you could incorporate some of that into your image. There are so many possibilities, so how will you finish your image with your colors and artistic mediums?