
Draw a lollipop in just 6 easy steps! There are many tasty treats, and lollipops are some of the tastiest you can eat! These treats can come in an almost endless number of colors, structures, and flavors. Even slightly, if you have a sweet tooth, there’s a lollipop to enjoy! The classic lollipop structure is somewhat of a swirl shape, and while it looks great, it cannot be easy to learn how to draw a lollipop with this shape. Don’t worry, though, because you’re on the right guide to see how it goes. We hope you enjoy this step-by-step guide on how to draw a lollipop in 6 steps! Drawing for kids
How to draw a lollipop – let’s get started!
Step 1
We’ll start with the outline of the lollipop in this first step of our guide on how to draw a lollipop! As mentioned, this lollipop will have a twisted shape. We’ll start with a circular shape for the outline of the lollipop. It won’t be a perfect circle, and the line will move inward near the bottom of the lollipop outline. This part that goes into the lollipop will curve a bit at the end and form the beginning of the swirling shape of the lollipop in the next steps. This all might sound a bit complicated, but it’s easier than it looks! Follow the reference image to ensure you don’t get lost while drawing.
Step 2 – Next, draw the lollipop stick.
A lollipop would be quite sticky and unpleasant to eat without a stick to hold on to, so we’ll draw one in this step of your lollipop drawing. This should be an easy step; it will be much easier if you use a ruler to help you. Draw two straight lines close together from the body of the lollipop. The stick will come from where the line moved on the lollipop in the first step. You can finish by connecting these lines with a short, flat one at the bottom. That’s it; let’s go to step 3!
Step 3 – Now, start drawing the lollipop swirl.
We started drawing the lollipop swirl in the first step of this guide on how to draw a lollipop, and in this step, we will be inspired by it. As you continue this line for the swirl, you will begin to see the purpose of the line you draw on the lollipop outline. Draw a line that curves inward on the pacifier, starting with this line coming out. Then follow the appearance of the curved line in our reference image to draw this swirling line.
Step 4 – Next, continue to extend the swivel line
We will continue with the swirl pattern in this part of your lollipop design. Hold the line you started in the previous step as you twist further into the lollipop. There will be a small gap in the center of this pattern at the end of this step, but we’ll fill it in with some final decorative details in the next step.
Step 5 – Now complete your lollipop drawing.
As mentioned in the previous step of this guide on how to draw a lollipop, we will finish the swirl pattern and add some final details in this part. First, extend the line of the twisted swirl further down the center of the lollipop. Once you’ve completed this jagged line, it’s time to decorate your lollipop! This is one area where you can opt for a different design from ours if you prefer, but for ours, we will be adding some small curved lines through the various swirls of the lollipop pattern.
This will create multiple sections in the lollipop, giving you plenty of options to give it lots of amazing colors later! Once you’ve finished the final details of this lollipop, you can move on to the final step. Before doing so, you can also add your details! These can include fun details like a bite mark on the lollipop, or you can draw a background that shows the other treats you’d like with this lollipop. Don’t tell your dentist! How are you going to finish this drawing before the final step?
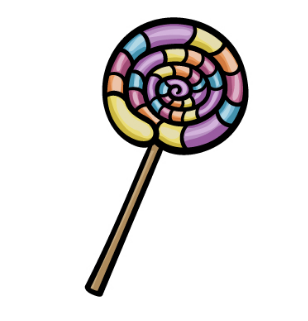
Step 6 – Finish your lollipop drawing with some color
Now comes the part of this guide that is perhaps the funniest of all! You can end up with amazing colors in this part of your lollipop drawing. We show you a way to colorize this image in our am.